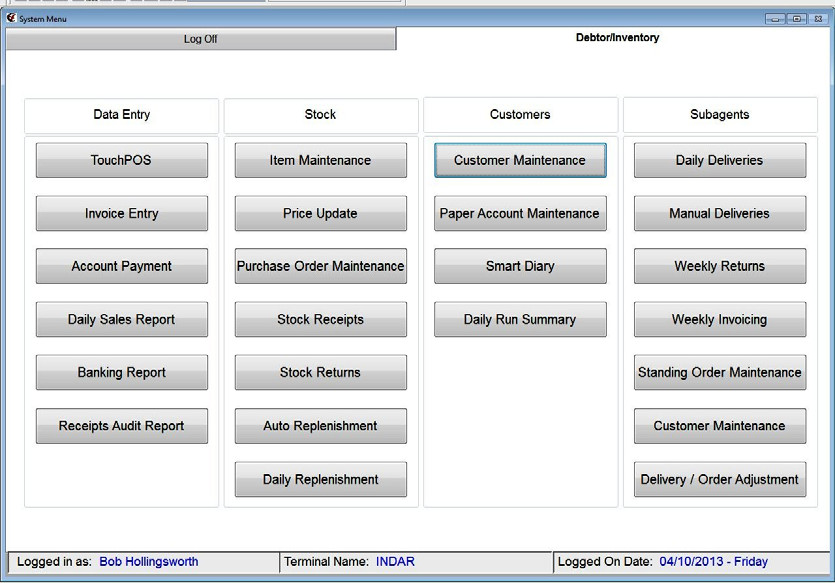
# Sub-Agent Account Maintenance
### Customer Account Maintenance
Add a New Customer Record.
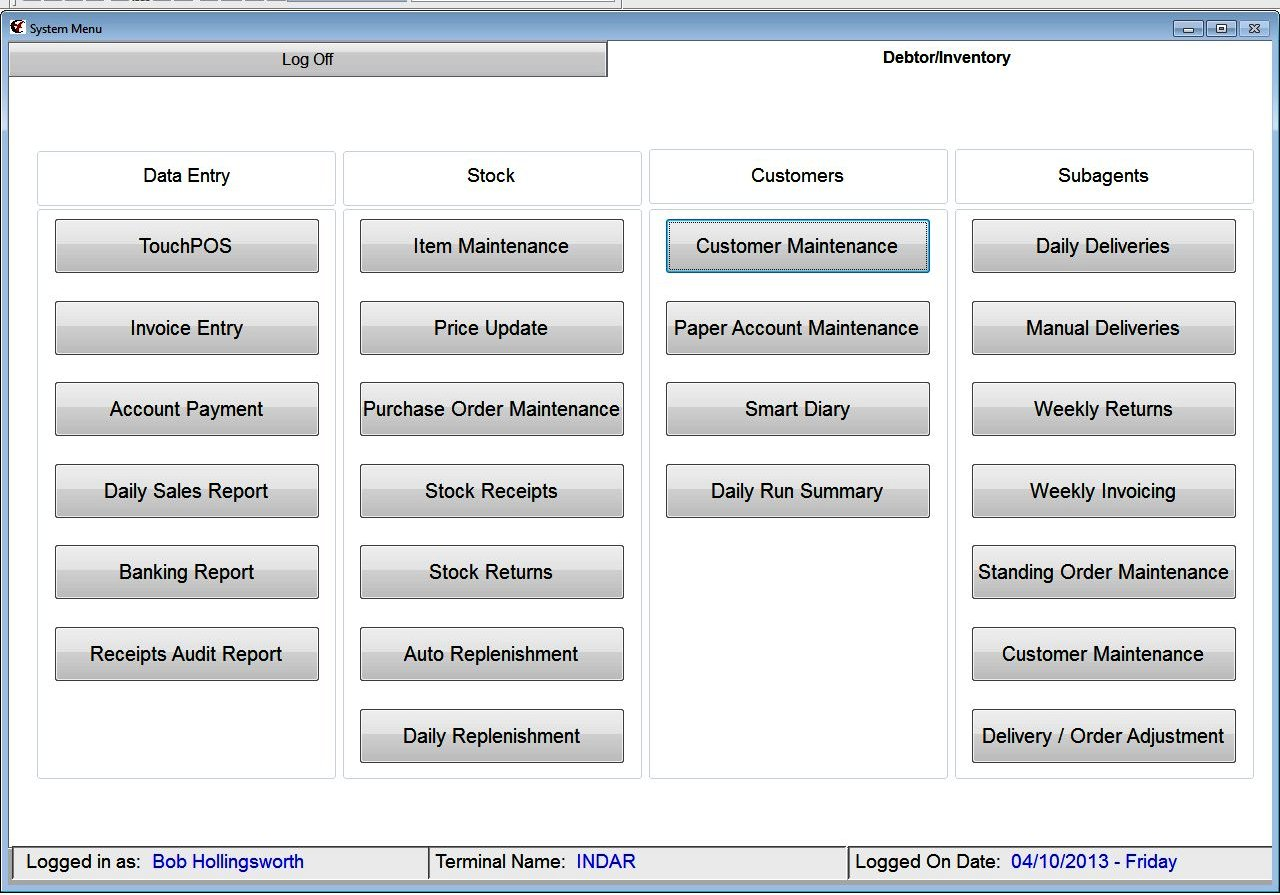
To add a New Customer record from the main menu
[](https://docs.computerlink.com.au/uploads/images/gallery/2023-08/sub-maint1.png)
Select the **Customer Maintenance** button.
**Press F11** to add a new record.
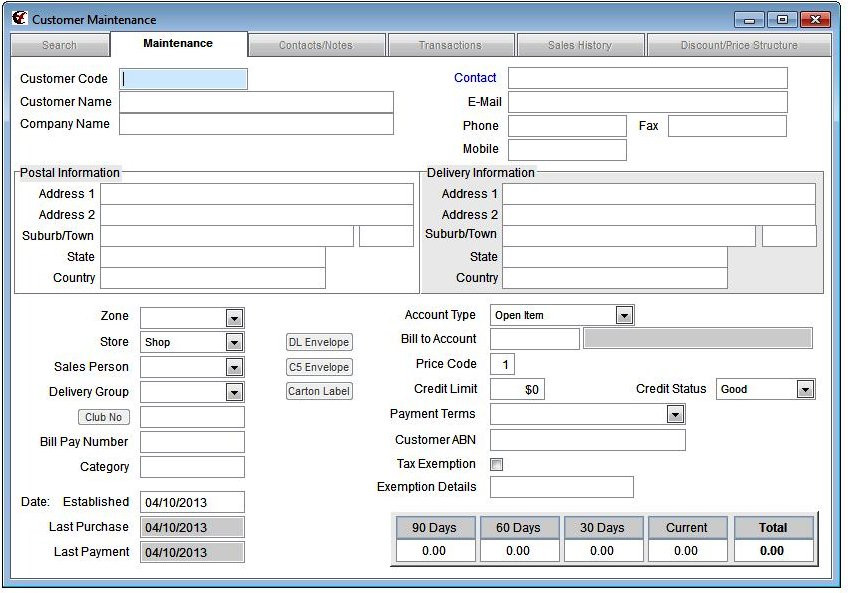
The **Customer Maintenance Screen** is displayed.
[](https://docs.computerlink.com.au/uploads/images/gallery/2023-08/sub-maint2.jpg)
The **Customer Code field** is highlighted. Enter the Customer Code for the customer. (Start by
typing the first three letters of the customer’s surname.)
Press the **enter** key.
The program will allocate the next available two digit number to the end of the three
characters just typed (e.g.: BRO01)
The **Customer Name field** is highlighted. . Enter the Customers Name. e.g.: John Brown.
Press the **enter** key.
The **Company Name field** is highlighted. The system will copy the customer name field
details to Company Name field.
If the Company Name is different type the new name into the field.
Press the **enter** key.
The **contact field** is highlighted. Type a contact name into this field.
Press the **enter** key.
The **Email Field** is highlighted. Enter the email address details
Press the **enter** key.
The **Phone field** is highlighted. Enter the phone number details.
Press the **enter** key.
The **Fax field** is highlighted. Enter the fax number details.
Press the **enter** key.
The **Mobile field** is highlighted. Enter the mobile phone number details.
Press the **enter** key.
The **Postal Address 1 Field** is highlighted. Enter the Street Address Details
Press the **enter** key.
The **Postal Address 2 field** is highlighted. Enter address street address information that may
not have fitted on the Address 1 field line
Press the **enter** key.
The **Suburb/Town field** is now highlighted. Enter the Suburb/Town details.
Press the **enter** key.
The **Postcode field** is now highlighted. Enter the Postcode for the suburb or Town.
Press the **enter** key.
The **State Field** is now highlighted. Enter the State.
Press the **enter** key.
The **country field** is now highlighted. Enter the Country.
Press the **enter** key.
The **Delivery Address 1 Field** is highlighted. Enter the Street Address Details
Press the **enter** key.
The **Delivery Address 2 field** is highlighted. Enter address street address information that
may not have fitted on the Address 1 field line
Press the **enter** key.
The **Suburb/Town field** is now highlighted. Enter the Suburb/Town details.
Press the **enter** key.
The **Postcode field** is now highlighted. Enter the Postcode for the suburb or Town.
Press the **enter** key.
The **State Field** is now highlighted. Enter the State.
Press the **enter** key.
The **Country field** is now highlighted. Enter the Country.
Press the **enter** key.
The **Zone field** is highlighted. From the drop down box select the number or area that you
require.
Press the **enter** key.
The **Store field** is now highlighted. Select the relevant store from the drop down box.
Press the **enter** key.
The **Salesperson field** is now highlighted. Leave blank or alternatively from the drop down
box select the salesperson.
Press the **enter** key.
The **Delivery Group field** is now highlighted. Leave blank or alternatively from the drop
down box select the delivery group.
Press the **enter** key.
The **Club No field** is highlighted. Leave this field blank.
Press the **enter** key.
The **Bill Pay Number field** is highlighted. Leave this field blank.
Press the **enter** key.
The **Category field** is now highlighted. Leave this field blank.
Press the **enter** key.
The **Date established field** is highlighted and automatically populated with the current date
Press the **enter** key
The **Date last purchase field** is highlighted and automatically populated with the current
date
Press the **enter** key.
The **Date last payment field** is highlighted and automatically populated with the current
date.
Press the **enter** key.
The **Account Type field** is highlighted. Select the appropriate account type from the drop
down box. For Subagents select the subagent option from the drop down box.
Press the **enter** key.
The **Bill to Account field** is highlighted. Leave this field blank; alternatively enter the
Customer Account Code that this account needs to be billed too.
Press the **enter** key.
The **Price Code field** is highlighted. Accept the default value that is selected.
Press the **enter** key.
The **Credit Limit Field** is highlighted. Enter a credit limit for the customer or leave this field
blank.
Press the **enter** key.
The **Credit Status field** is highlighted.
Press the **enter** key.
The **Payment terms field** is highlighted, from the drop down box choose the appropriate
terms.
Press the **enter** key.
The **Customer ABN Field** is highlighted. Enter the customers ABN if required, or alternatively
leave this field blank.
Press the **enter** key.
The **Tax exemption field** is highlighted. Leave the box blank.
Press the **enter** key.
The **Exemption details field** is highlighted. Leave this field blank.
Press the **enter** key.
Press **F12** to save.
###
### Creating Standing Orders for a Sub‐Agent.
From the Main Computerlink Menu select the Standing Order Maintenance button.
[](https://docs.computerlink.com.au/uploads/images/gallery/2023-08/sub-maint3.jpg)
The Screen below will be displayed.
[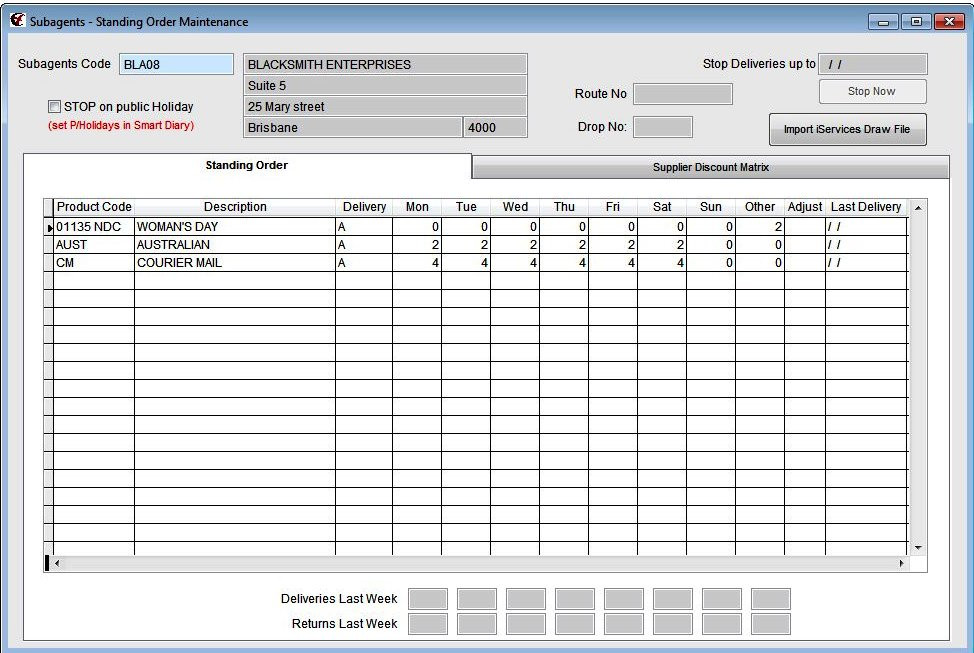](https://docs.computerlink.com.au/uploads/images/gallery/2023-08/sub-maint4.jpg)
Press the **F10** key to alter the current record.
The **Product code** field is highlighted.
Pressing the **F4** key within the highlighted field enable you to search the product file for the
Product code that you require.
Press the **enter** key to select the Product Code.
Alternatively you may enter the Product Code
Press the **enter** Key.
The description field is filled automatically with details of the Product that you have
selected.
The **Delivery field** is highlighted.
This field enables you to categorize the Subagents into different delivery area.
Press the **enter** key.
Enter the Quantity required for Monday
Press the **enter** key.
Enter the Quantity required for Tuesday
Press the **enter** key.
Enter Quantity required for Wednesday.
Press the **enter** key.
Enter the Quantity required for Thursday.
Press the **enter** key.
Enter the quantity required for Friday.
Press the **enter** key.
Enter the quantity required for Saturday.
Press the **enter** key.
Enter the Quantity required for Sunday.
Press the **enter** key.
Press the **enter** key through the other field
If this is a Magazine you may enter through to the other field and enter the quantity that
you require.
Placing the magazine in the other field enable the item to be charged and allocated to the
Subagent when the magazines are brought in through stock receipts.
These steps may be repeated until all the product codes the subagent requires are entered
into standing orders.
Press **F12** to save.
At the top of the Standing Order Screen for a particular subagent there are also several
other options that can be enabled.
There is an option to stop on Public Holidays with this item ticked you still need to ensure
that the public holidays are entered in the smart diary.
There is an option to stop deliveries up to a certain date. This is useful for when a subagent
may close over the Christmas New Year period. The date that you enter into the system
needs to be the day before they recommence and needs to be entered after their last day of
delivery. Press the Stop Now button when in alter mode for this to activate.
At the Bottom of the Screen you can see at a glance the previous week’s deliveries and
returns for the first product on the subagent standing order.
If you wish to look at the previous week of another product then you need to press F10 to
enter alter mode and then highlight the product that you require and the weeks deliveries
and returns will change to reflect the sales and returns for the previous week of the product
code.
Press **F12** to save to exit.
**i‐Services Module Additional Functions**
**These button and fields are only visible if the iServices Module is Active.**
To utilise the import iServices draw file button please contact Computerlink Support for
further information.
The Route Number Field relates to the Customer file reference number in the iServices draw
file.
### Subagent Account Maintenance – Suppliers Discount Matrix
[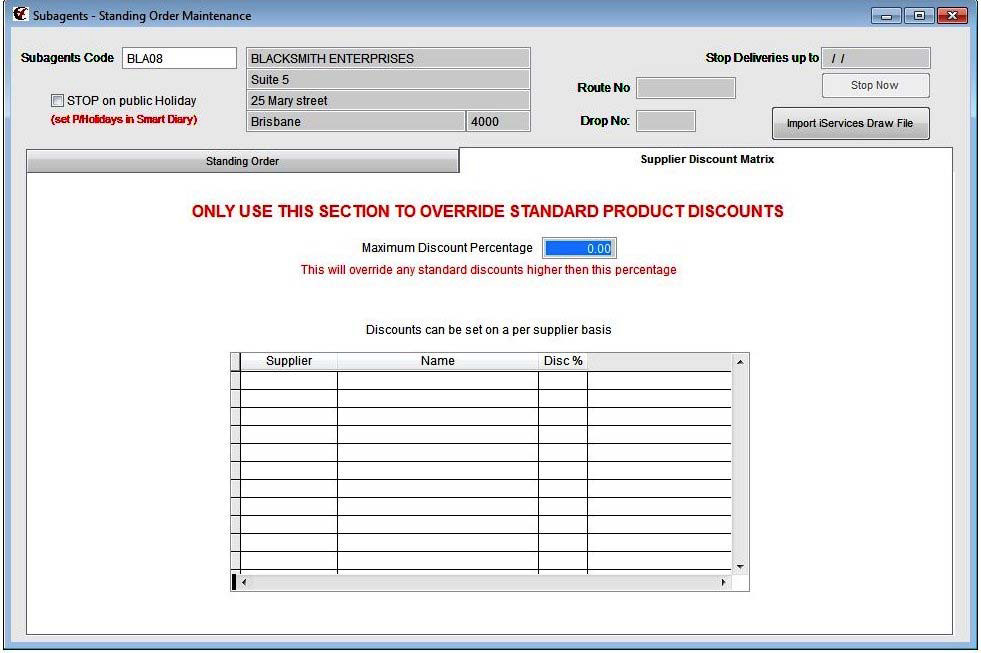](https://docs.computerlink.com.au/uploads/images/gallery/2023-08/sub-maint5.jpg)
This section is only used if you wish to override the discount on particular product from a particular
supplier please use with care.
### Subagent Weekly Return Form Print
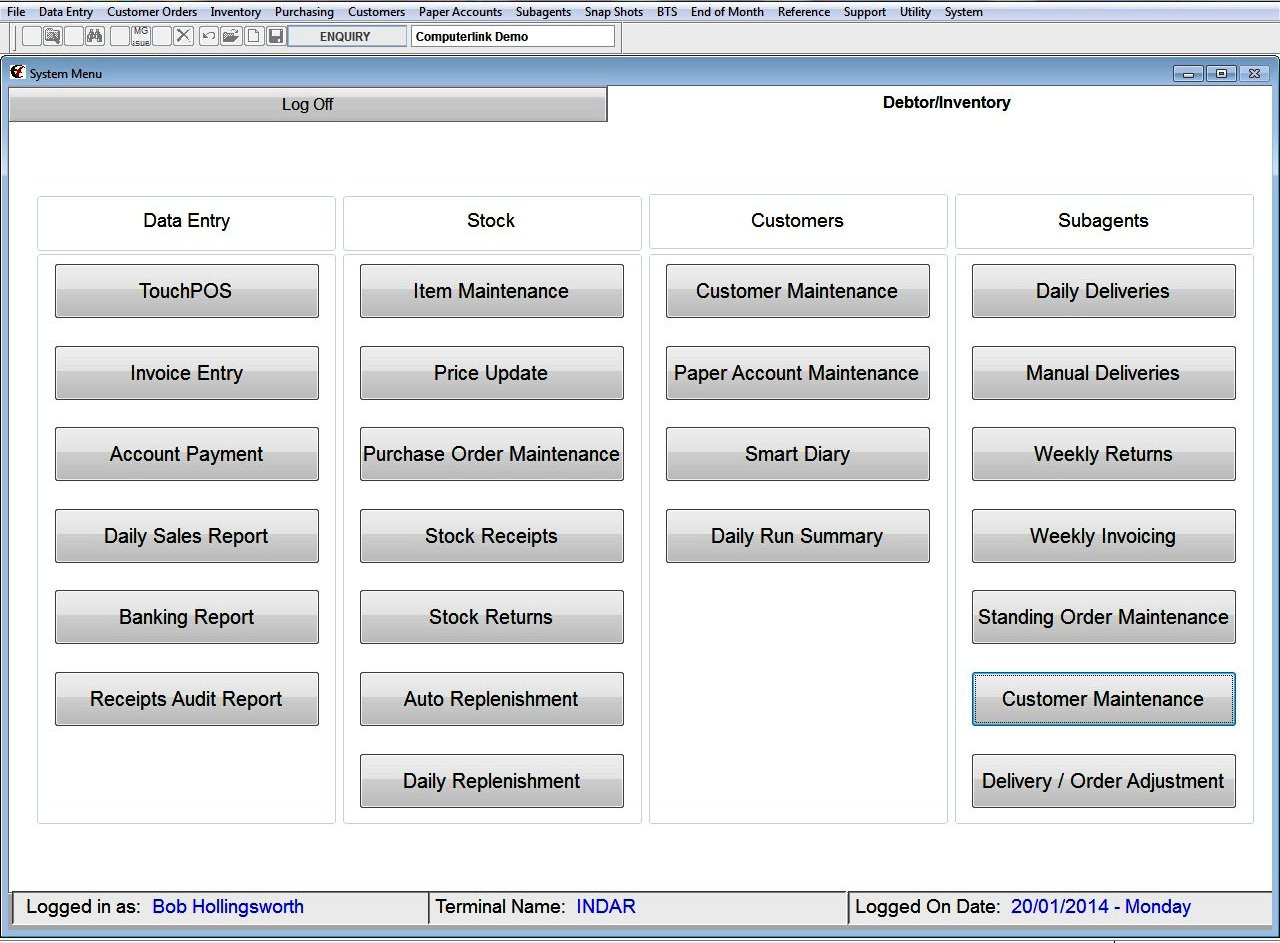
At the end each of week to print subagent return forms from the Main Screen of
Computerlink Shown Below
[](https://docs.computerlink.com.au/uploads/images/gallery/2023-08/sub-maint6.jpg)
Select the Subagent Drop down from the drop down menu at the top of the screen
[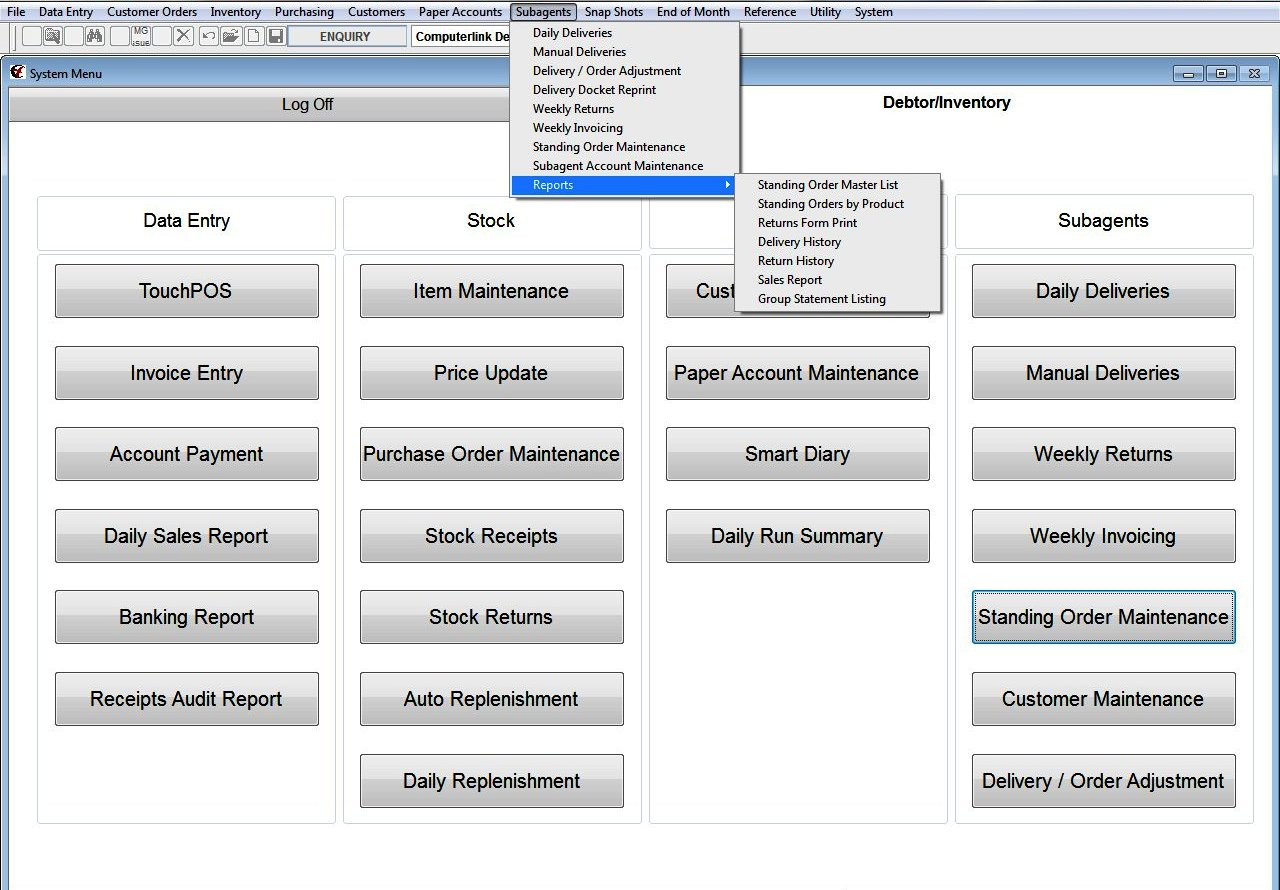](https://docs.computerlink.com.au/uploads/images/gallery/2023-08/sub-maint7.jpg)
Select Reports and then select Return Form Print. The following screen will be displayed.
[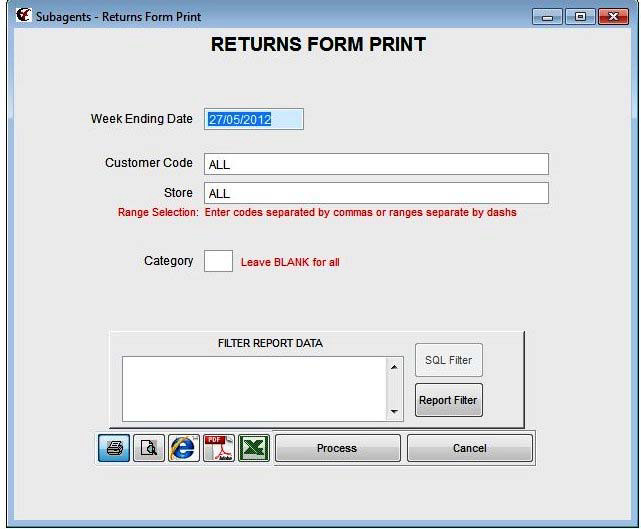](https://docs.computerlink.com.au/uploads/images/gallery/2023-08/sub-maint8.jpg)
In the picture below is a copy of the return report to be supplied to each subagent at the
end of every week. This report can be run after the daily deliveries for subagents are
completed for Sunday. It is possible to print for a single subagent or for all subagents.
Once the invoice has been completed for the subagent it is not possible to reprint a copy of
the weekly return form.
[](https://docs.computerlink.com.au/uploads/images/gallery/2023-08/sub-maint9.jpg)
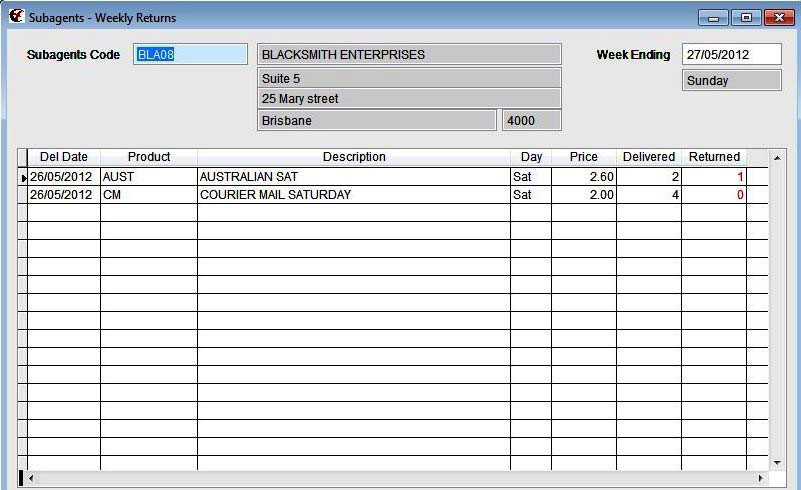
### Subagent Weekly Returns
From the main screen of Computerlink
[](https://docs.computerlink.com.au/uploads/images/gallery/2023-08/sub-maint10.jpg)
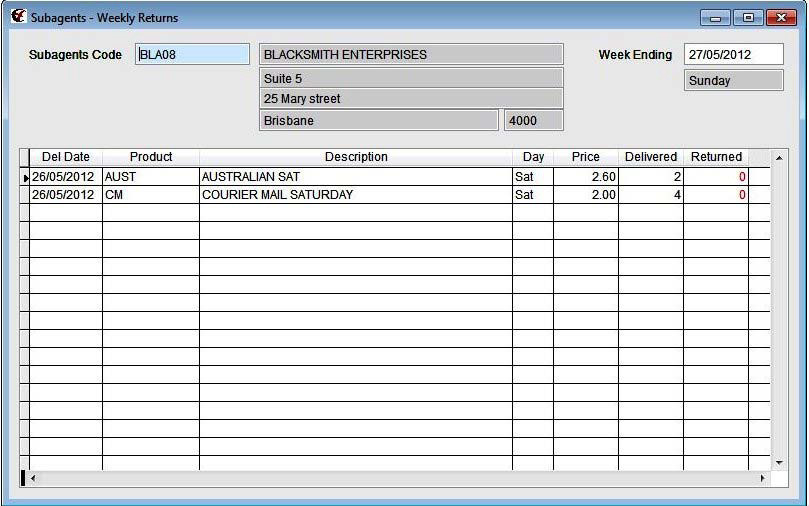
Under the Subagent heading select the weekly Returns Button the following screen will be
displayed.
[](https://docs.computerlink.com.au/uploads/images/gallery/2023-08/sub-maint11.jpg)
Press **F10** to alter the current Record
The week ending date should be the date for Sunday for the week just gone.
If you have missed a week and have not processed the invoice for a subagent you can back
date it to that particular week ending date.
The **returns field** will now be highlighted.
Enter the return amount for the product.
Press the **enter** key.
(Note if there are no returns for a particular product enter 0 and press the enter key.)
Continue this process for all paper and magazine returns.
Press **F12** to save when completed.
(It is possible to add magazines to a return by scanning them into the system on a blank line
and entering zero for delivered and the quantity for return)
Complete this process for each Subagent.
See Completed return form picture below.
[](https://docs.computerlink.com.au/uploads/images/gallery/2023-08/sub-maint12.jpg)
### Subagent ‐ Weekly Invoicing.
From the Main screen of Computerlink under the subagent heading select the Weekly
Invoicing button
[](https://docs.computerlink.com.au/uploads/images/gallery/2023-08/sub-maint13.jpg)
The following Screen is then displayed.
[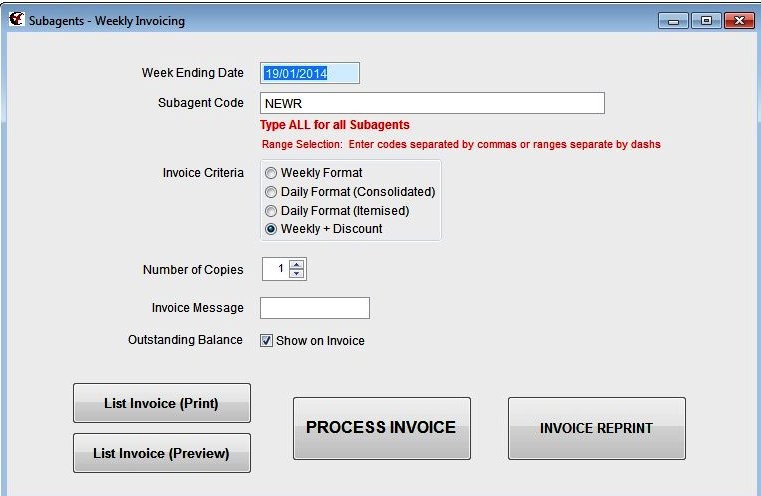](https://docs.computerlink.com.au/uploads/images/gallery/2023-08/sub-maint14.jpg)
The Week ending date should be the week that has just been completed.
Enter the subagent code or all to print all subagent Invoices.
In the invoice Criteria field choose the type of format that you require for your invoice to
the subagent.
Select the number of invoices that you wish to print with the arrow in the right hand side of
the Number of Copies field.
Prior to processing the invoice chose the list invoice button to check the invoice that you are
sending to subagent. At this point you are still able to correct any errors that may have been
made.
Below is a copy of a list invoice
[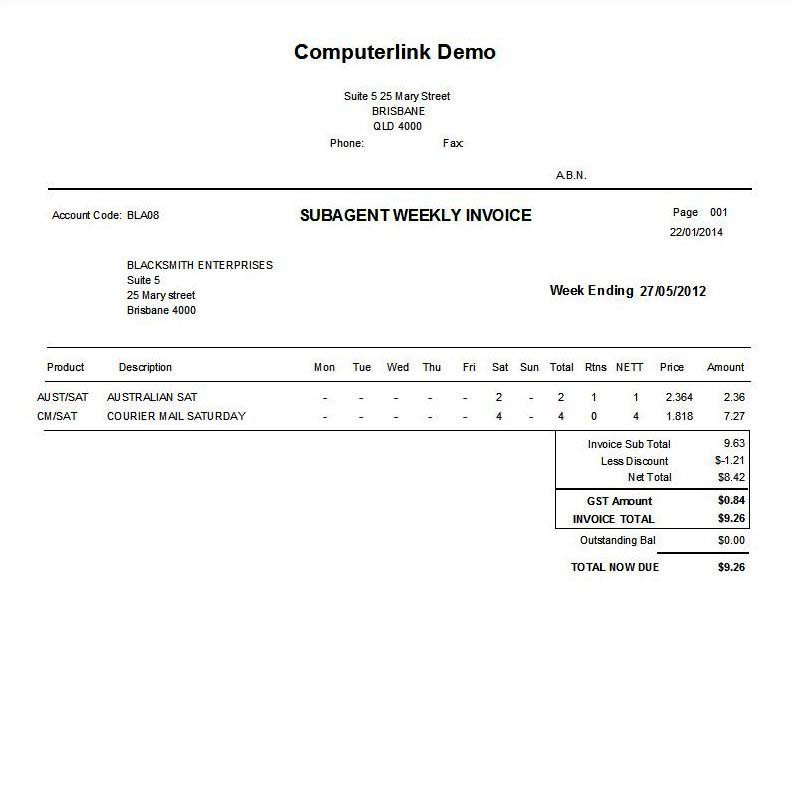](https://docs.computerlink.com.au/uploads/images/gallery/2023-08/sub-maint15.jpg)
If you are satisfied that the invoice is complete and no corrections need to be made
Select the process button and process the invoice.
### Subagent – Daily Deliveries.
From the main Computerlink Screen upon selecting the Daily Deliveries button under the
Subagent Heading the following screen will be displayed.
[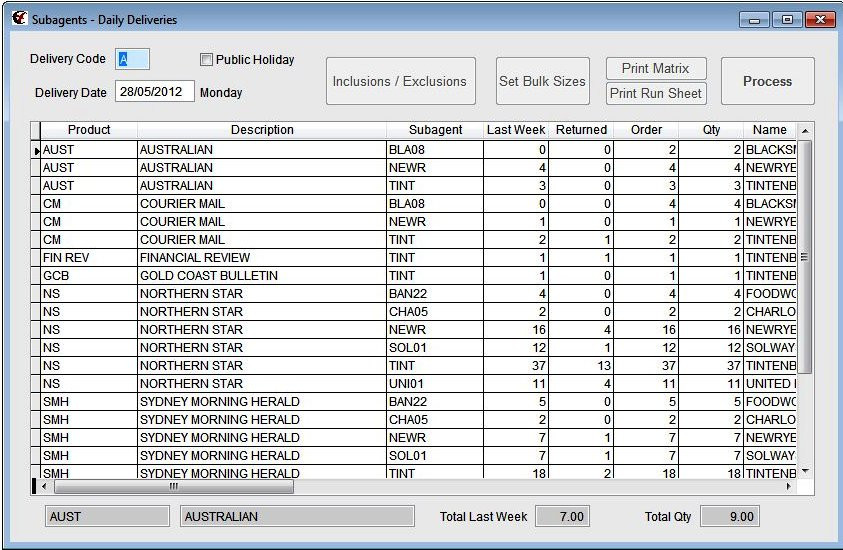](https://docs.computerlink.com.au/uploads/images/gallery/2023-08/sub-maint16.jpg)
This screen displays all the items that are required for all the subagent for delivery on a
particular day.
Press the **F10** key to alter the current record.
The **Deliver code field** is highlighted with A in it.
The **Delivery Date field** is highlighted with the current date and beside it the day of the
week.
There is a box option for Public Holidays‐ This needs to be set in smart diary for this feature
to have any effect on the daily deliveries.
At this point in the process it is possible to exclude publications or alter the quantity to be
delivered to a subagent.
[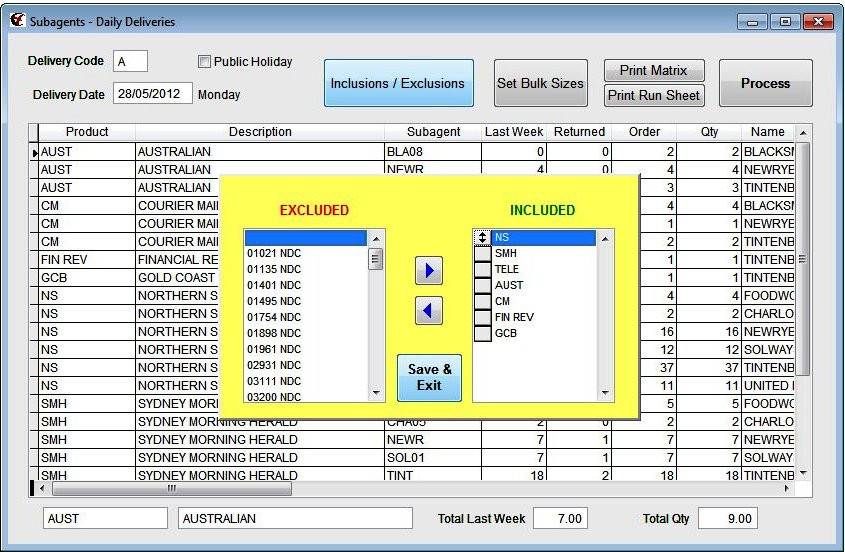](https://docs.computerlink.com.au/uploads/images/gallery/2023-08/sub-maint17.jpg)
It is also possible to set the bulk sizes for subagents for the next day. If this is set it will
appear on the delivery docket for the subagents. Contact Computerlink Support if you wish
to use the bulk size layout.
Press the **Process** Button.
The Subagents Delivery Matrix will be printed followed by the Subagent Delivery Sheets see
example of Subagent Delivery Sheet below.
[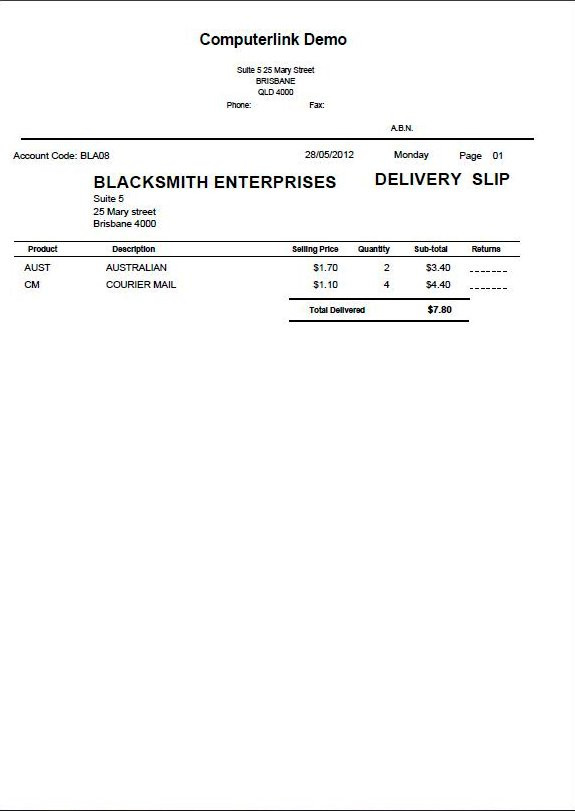](https://docs.computerlink.com.au/uploads/images/gallery/2023-08/sub-maint18.jpg)
### Subagent ‐Delivery Reprint
It is possible to reprint a deliver docket for a particular subagent or for all subagents if the
printer did not work.
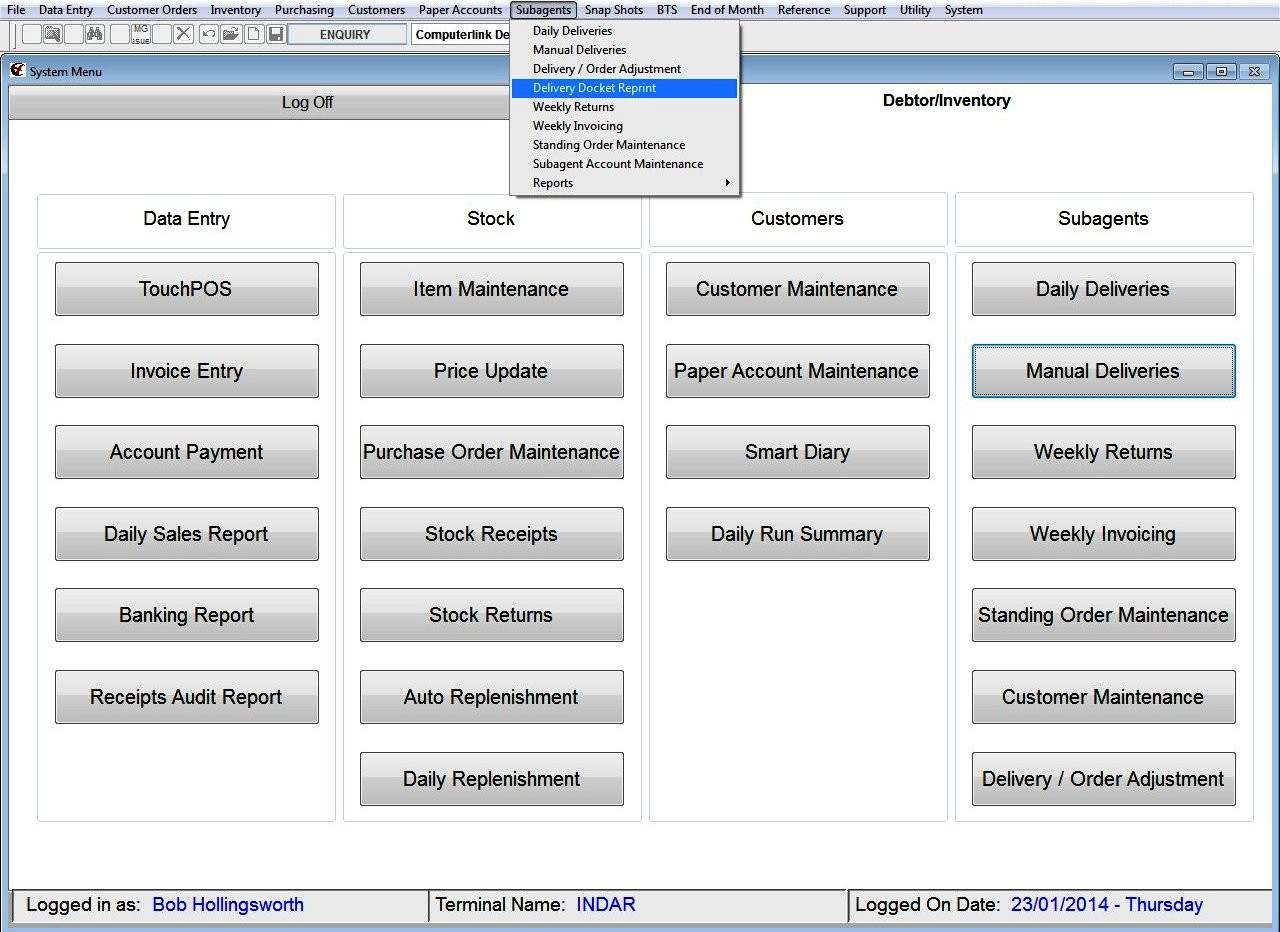
From the main Computerlink Menu
Select Subagents from the top drop down menus and select the Delivery Docket Reprint
option
[](https://docs.computerlink.com.au/uploads/images/gallery/2023-08/sub-maint19.jpg)
The following Screen will be displayed.
[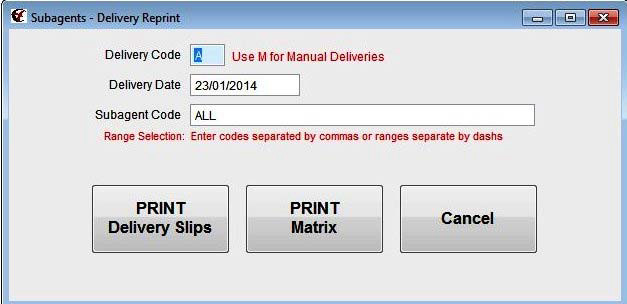](https://docs.computerlink.com.au/uploads/images/gallery/2023-08/sub-maint20.jpg)
Enter the Date that you wish to print the Delivery slips or Matrix.
Press the **enter** key.
Enter All for All subagents or enter a particular subagents Code
Press the **enter** key.
Select the Print Delivery Slips Button or Print Matrix Button.
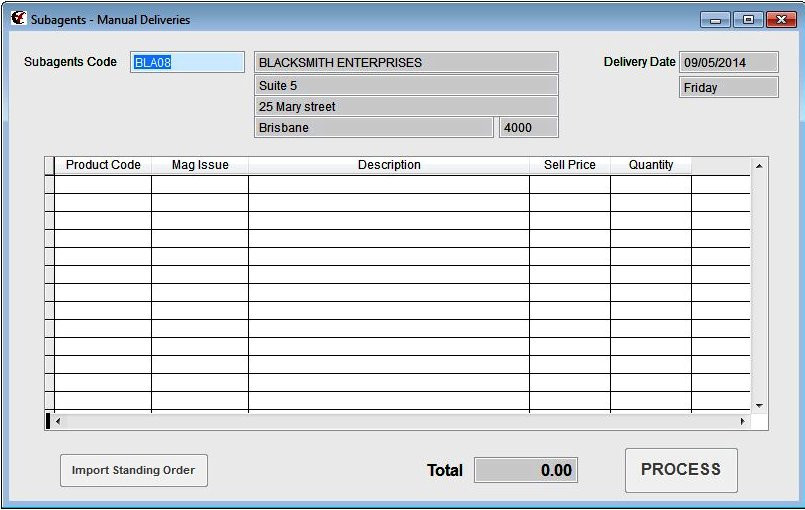
### Subagents‐ Manual Deliveries
From the Main Computerlink Menu
[](https://docs.computerlink.com.au/uploads/images/gallery/2023-08/sub-maint21.jpg)
Select the Manual Deliveries button from under the Subagents heading.
The Subagents Manual Delivery Screen is displayed (see picture below)
[](https://docs.computerlink.com.au/uploads/images/gallery/2023-08/sub-maint22.jpg)
Press **F10** to alter if this is required Subagent.
Alternatively Pressing the **F4** key brings up a search screen for subagents, highlight the
required subagent and press the select button.
Press **F10** to alter
The **Delivery date field** is highlighted
Enter the Delivery date you require in the field